
Here at Soluto we use React Native to build our mobile apps. We often use Animated to drive animations designed to give our users a smoother and friendlier experience.
Recently, I was working on a feature that called for a cool, fun animated header. When researching online for how to get started I discovered that most information on the web about React Native Animated refers to “independent” animations, the kind triggered by clicking a button or loading a page. I couldn’t find a lot of info on animating components based on the scroll position of a ScrollView. So I’ve decided to share my 2 cents here in the hopes that it will make this job easier for the next dev to tackle something similar.
How it looks
Here’s an example I created that I’ll refer to throughout the post:
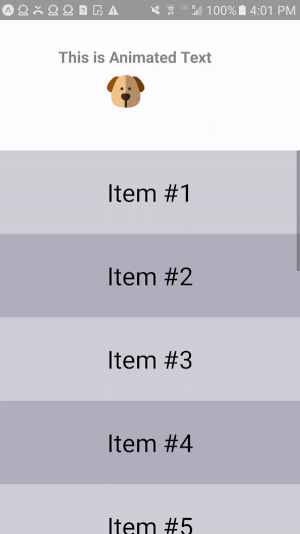
My example is composed of an Animated.ScrollView containing an AnimatedHeader component which is basically a View with different types of Animated components inside of it:
-
Animated.Text(which reads “This is Animated Text”) Animated.Image(the cute doggy).
Each of the Animated components inside the header have styling/transforms/scaling/opacity linked to animationRangewhich is the current scroll position Animated.Value.
The scroll position of a scrollView can be mapped to an Animated.Value using Animated.event as explained here .
Basically, I’m linking a property in the state named scrollY to the value of the scroll position inside onScroll, here’s the code for the ScrollView and header:
import React from 'react';
import { StyleSheet, Text, View, ScrollView, Animated } from 'react-native';
import {compose, withState, withProps} from 'recompose';
import AnimatedHeader from './AnimatedHeader';
import ItemInScroll from './ItemInScroll';

export const scrollRangeForAnimation = 100;

const HeaderPlaceholder = <View style={{flex: 0, height: 200, width: '100%'}} />;

const Demo = ({scrollY, animationRange}) => {
    let _scrollView = null;

    const onScrollEndSnapToEdge = event => {
        const y = event.nativeEvent.contentOffset.y;
        if (0 < y && y < scrollRangeForAnimation / 2) {
            if (_scrollView) {
                _scrollView.scrollTo({y: 0});
            }
        } else if (scrollRangeForAnimation / 2 <= y && y < scrollRangeForAnimation) {
            if (_scrollView) {
                _scrollView.scrollTo({y: scrollRangeForAnimation});
            }
        }
    };

      return (
        <View style={styles.container}>
            <Animated.ScrollView
                style={styles.scrollView}
                ref={scrollView => {
                    _scrollView = scrollView ? scrollView._component : null;
                }}
                onScrollEndDrag={onScrollEndSnapToEdge}
                onMomentumScrollEnd={onScrollEndSnapToEdge}
                onScroll={Animated.event(
                    [
                        {
                            nativeEvent: {contentOffset: {y: scrollY}},
                        },
                    ],
                    {
                        useNativeDriver: true,
                    }
                )}
                >
                {HeaderPlaceholder}
                <ItemInScroll numberOfItem={1} />
                <ItemInScroll numberOfItem={2} />
                <ItemInScroll numberOfItem={3} />
                <ItemInScroll numberOfItem={4} />
                <ItemInScroll numberOfItem={5} />
                <ItemInScroll numberOfItem={6} />
                <ItemInScroll numberOfItem={7} />
                <ItemInScroll numberOfItem={8} />
                <ItemInScroll numberOfItem={9} />
                <ItemInScroll numberOfItem={10} />
                <ItemInScroll numberOfItem={11} />
            </Animated.ScrollView>
            <AnimatedHeader animationRange={animationRange}/>
        </View>
      );
}

const styles = StyleSheet.create({
  container: {
    flex: 1
  },
  scrollView: {
    flex:1,
    zIndex: 1
  }
});

const enhance = compose(
    withState('scrollY', 'setScrollY', () => new Animated.Value(0)),
    withProps(({scrollY}) => ({
        animationRange: scrollY.interpolate({
            inputRange: [0, scrollRangeForAnimation],
            outputRange: [0, 1],
            extrapolate: 'clamp',
        }),
    }))
);

export default enhance(Demo);
The line nativeEvent: {contentOffset: {y: scrollY}} is equivalent to scrollY = e.nativeEvent.contentOffset.y.
After that I normalized the value and called it animationRange.
Now that we’ve covered the basics, here are 4 tips that I used in my example:
Always use Native Driver
Always set useNativeDriver:true in your animation configurations. It will make your animations smooth by skipping the back-and-forth over the bridge between JS code and native code for every rendered frame.
I recommend further reading here .
You should, however, note the caveats of this flag. Though I believe they are well worth the smoothness achieved and we’ve made it a habit in Soluto of always setting useNativeDriver:true and working around whatever limitations it may bring. So far it’s proven to be little pain for a lot of gain.
The source code for React Native contains the full list of white-listed animation styles supported with native driver, it can be found here.
This feature is supported in React Native version 0.40 and up.
Use flexbox with onLayout
When using flexbox you don’t know the absolute positions of components so at first glance it seems difficult to figure out the absolute distances and sizes you need for the animations.
By calling onLayout you can get your component’s x,y position, as well as its width and height. That will allow you to use flexbox positioning as usual for the initial positioning of your component, but to use the exact (absolute) measurements of location and size to compute the distances and scaling necessary for your animation.
This method can also be used if you need an invisible (color:'transparent') “placeholder” component for calculation purposes only (a scenario I’ve encountered before but haven’t covered in this example).
You may notice I’m using recompose a lot in my code. Check it out if you are unfamiliar with this library. It makes writing high order components much easier and more elegant. Of course everything I did with recompose can be done in other ways without HOC’s.
This is the code for the HOCs of self measurement:
import {compose, withState, withProps} from 'recompose';

const withMeasurements = compose(
    withState('elementX', 'setX', 0),
    withState('elementY', 'setY', 0),
    withState('elementWidth', 'setWidth', 0),
    withState('elementHeight', 'setHeight', 0)
);

const withOnLayout = withProps(({setX, setY, setWidth, setHeight}) => ({
    onLayoutSetMeasurements: event => {
        setX(event.nativeEvent.layout.x);
        setY(event.nativeEvent.layout.y);
        setWidth(event.nativeEvent.layout.width);
        setHeight(event.nativeEvent.layout.height);
    },
}));

export const withSelfMeasure = compose(withMeasurements, withOnLayout);
And here you can see how to use the self measurement HOCs together with onLayout in the AnimatedText component:
import React from 'react';
import { StyleSheet, Text, View, Animated } from 'react-native';
import {withSelfMeasure} from './utils/selfMeasureBehavior';
import {compose} from 'recompose';
import buildTransform from './utils/buildTransform';


const AnimatedText = ({
    animationRange,
    onLayoutSetMeasurements,
    elementX,
    elementY,
    elementHeight,
    elementWidth,}) => {

        const animateText = buildTransform(animationRange, elementX, elementY, elementHeight, elementWidth, 20, 70, 0.7);
        const animateOpacity = {
            opacity: animationRange.interpolate({
                inputRange: [0, 0.9, 1],
                outputRange: [1, 0, 1],
            }),
        };

        return (
            <Animated.Text
                style={[styles.text, animateText, animateOpacity]}
                onLayout={event => onLayoutSetMeasurements(event)} >
                This is Animated Text
            </Animated.Text>
        )
}

const styles = StyleSheet.create({
    text: {
        fontSize: 20,
        color: '#696969',
        fontWeight: 'bold'
    }
});

const enhance = compose(withSelfMeasure);

export default enhance(AnimatedText);
Avoid awkward mid-animation stops
Always snap to the edges of the animation if the user stops scrolling in the middle.
This can be achieved by using onScrollEndDrag and onMomentumScrollEnd, as I did in the ScrollView component:
const Demo = ({scrollY, animationRange}) => {
    let _scrollView = null;

    const onScrollEndSnapToEdge = event => {
        const y = event.nativeEvent.contentOffset.y;
        if (0 < y && y < scrollRangeForAnimation / 2) {
            if (_scrollView) {
                _scrollView.scrollTo({y: 0});
            }
        } else if (scrollRangeForAnimation / 2 <= y && y < scrollRangeForAnimation) {
            if (_scrollView) {
                _scrollView.scrollTo({y: scrollRangeForAnimation});
            }
        }
    };

      return (
        <View style={styles.container}>
            <Animated.ScrollView
                style={styles.scrollView}
                ref={scrollView => {
                    _scrollView = scrollView ? scrollView._component : null;
                }}
                onScrollEndDrag={onScrollEndSnapToEdge}
                onMomentumScrollEnd={onScrollEndSnapToEdge}
                onScroll={Animated.event(
                    [
                        {
                            nativeEvent: {contentOffset: {y: scrollY}},
                        },
                    ],
                    {
                        useNativeDriver: true,
                    }
                )}
Decide on a scroll range for the animation
Using a smaller or a larger scrolling range for your animation will make it feel longer or shorter. Try changing this number and see how it behaves.
Also, always normalize it for calculations. By interpolating the scroll range from whatever number you chose (such as [0,100] in my case) to [0,1] and using that in all of the internal components you will simplify your calculations in all the other components and avoid bugs.
In my example, you can see I set scrollRangeForAnimation:
export const scrollRangeForAnimation = 100;
And exposed it as animationRange to all other components:
const enhance = compose(
    withState('scrollY', 'setScrollY', () => new Animated.Value(0)),
    withProps(({scrollY}) => ({
        animationRange: scrollY.interpolate({
            inputRange: [0, scrollRangeForAnimation],
            outputRange: [0, 1],
            extrapolate: 'clamp',
        }),
    }))
);

export default enhance(Demo);
I hope you found this helpful. Please feel free to leave a comment or question!
The code for my example can be found here

Leave a Reply